此篇主要說明如何讓網站實現多國語言,範例程式碼可參考這裡。
主要核心元件為react-i18next,透過設定的方式來實現多國語言的切換,想要知道更多的內容可以參考官網。
那麼就教學開始!
首先需要先安裝i18Next、react-i18Next、i18Next-http-backend和i18Next-borwser-languagedetector
指令碼↓↓↓↓↓↓↓
npm install react-i18next i18next i18next-http-backend i18next-browser-languagedetector --save
再來看一下最後完工的檔案結構,紅色是要新增的部分
src
├─locales
│ ├─en
│ │ └─translation.json
│ └─zh
│ └─translation.json
│
├─app.tsx
├─index.tsx (要import等等設定好的i18n)
├─package.json
└─i18n.ts
先新增語言檔,分成en和zh(中文都只用繁體中文,所以不用在加-Tw)
---------------locales/en/translation.json------------------
{
"SwitchLan": "Switch Language",
"Login": {
"SignIn": "Sign in",
"Account": "Account",
"Password": "Password",
"Remember": "Remember me",
"ForgetPassword": "Forgot password?"
}
}
---------------locales/zh/translation.json------------------
{
"SwitchLan": "切換語言",
"Login": {
"SignIn": "登入",
"Account": "帳號",
"Password": "密碼",
"Remember": "記住我",
"ForgetPassword": "忘記密碼?"
}
}
再來新增i18n.ts(i18n設定檔)
--------------------------i18n.ts------------------------------
import i18n from 'i18next';
import Backend from 'i18next-http-backend';
import LanguageDetector from 'i18next-browser-languagedetector';
import { initReactI18next } from 'react-i18next';
import translationEN from './locales/en/translation.json';
import translationZH from './locales/zh-tw/translation.json';
const resources = {
en: {
translation:translationEN,
},
zh: {
translation:translationZH
}
};
i18n
// load translation using http -> see /public/locales
// learn more: https://github.com/i18next/i18next-http-backend
.use(Backend)
// detect user language
// learn more: https://github.com/i18next/i18next-browser-languageDetector
.use(LanguageDetector)
// pass the i18n instance to react-i18next.
.use(initReactI18next)
// init i18next
// for all options read: https://www.i18next.com/overview/configuration-options
.init({
resources,
fallbackLng: 'en',
lng:"zh",
debug: true,
interpolation: {
escapeValue: false, // not needed for react as it escapes by default
},
});
export default i18n;
----------------------------------------------------------------
打開index.tsx,把i18n設定檔import進去(紅字為修改部分)
--------------------------index.tsx------------------------------
import React from 'react';
import ReactDOM from 'react-dom/client';
import './index.css';
import App from './App';
import reportWebVitals from './reportWebVitals';
import './i18n';
const root = ReactDOM.createRoot(
document.getElementById('root') as HTMLElement
);
root.render(
<React.StrictMode>
<App />
</React.StrictMode>
);
...
-------------------------------------------------------------------
簡單來說就是使用const{t}=useTranslation()後在用t('Key')去抓取對應的文字
p.s. 如果要多層結構以.隔開,例如t('login.key')
下方紅字為登入頁異動部分(有...代表被省略,請勿直接複製貼上)
--------------------------Login.tsx------------------------------
...
import UserContext from '../contexts/UserContext';
import { useTranslation } from 'react-i18next';
...
export default function Login() {
//登入訊息
const [LoginMsg, setLoginMsg] = useState<string>('');
//登入資訊Context
const userContext:any = useContext(UserContext)
//登入確認
const handleSubmit = ...
//i18n
const { t,i18n } = useTranslation();
return (
<ThemeProvider theme={theme}>
<Grid container component="main" sx={{ height: '100vh' }}>
<CssBaseline />
<Grid
item
xs={false}
sm={4}
md={7}
sx={{
backgroundImage: 'url(https://source.unsplash.com/random)',
backgroundRepeat: 'no-repeat',
backgroundColor: (t) =>
t.palette.mode === 'light' ? t.palette.grey[50] : t.palette.grey[900],
backgroundSize: 'cover',
backgroundPosition: 'center',
}}
/>
<Grid item xs={12} sm={8} md={5} component={Paper} elevation={6} square>
<Box
sx={{
my: 8,
mx: 4,
display: 'flex',
flexDirection: 'column',
alignItems: 'center',
}}
>
<Avatar sx={{ m: 1, bgcolor: 'secondary.main' }}>
<LockOutlinedIcon />
</Avatar>
<Typography component="h1" variant="h5">
{t('Login.SignIn')}
</Typography>
<Box component="form" noValidate onSubmit={handleSubmit} sx={{ mt: 1 }}>
<TextField
error={LoginMsg !== ''}
margin="normal"
required
fullWidth
id="account"
label={t('Login.Account')}
name="account"
autoFocus
/>
<TextField
error={LoginMsg !== ''}
margin="normal"
required
fullWidth
name="password"
label={t('Login.Password')}
type="password"
id="password"
autoComplete="current-password"
helperText={LoginMsg !== '' ? LoginMsg:""}
/>
<FormControlLabel
control={<Checkbox value="remember" color="primary" />}
label={t('Login.Remember')}
name="remember"
/>
<Button
type="submit"
fullWidth
variant="contained"
sx={{ mt: 3, mb: 2 }}
>
{t('Login.SignIn')}
</Button>
<Grid container>
<Grid item xs>
<Link href="#" variant="body2">
{t('Login.ForgetPassword')}
</Link>
</Grid>
<Grid item>
<Link href="#" variant="body2" onClick={() => { i18n.changeLanguage(i18n.language=="en"?"zh":"en") }}>
{t('SwitchLan')}
</Link>
</Grid>
</Grid>
<Copyright sx={{ mt: 5 }} />
</Box>
</Box>
</Grid>
</Grid>
</ThemeProvider>
);
--------------------------------------------------------------------
這樣登入頁就有多國語系了,這次在按鈕的右下有加入一個連結來實現切換功能。
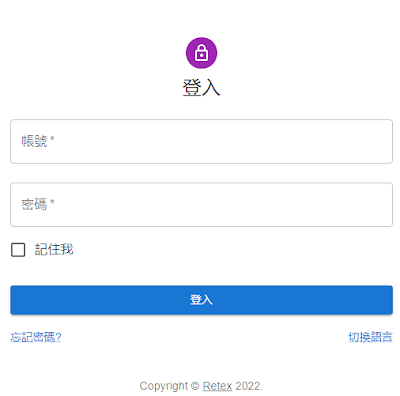 |
| 因預設zh,所以會先顯示中文 |
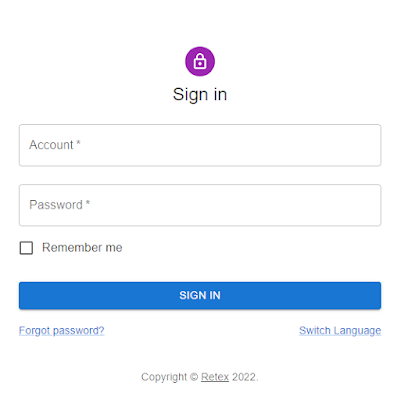 |
| 點選"切換語言",就會變成英文頁面。 |
這樣就完成了多國語言的實作,只要在需要的頁面使用useTransaltion()就可以使用
而且i18next還有許多優點以及功能,例如自動偵測瀏覽器語言(需載入i18next-browser-languagedetector)、下次進入時會抓取上次的語言設定等等,未來如果有更多實作會在持續更新。


